
首先使用bash <(curl -L -s https://install.direct/go.sh)来快捷安装v2ray,如下:
root@vm:~# bash <(curl -L -s https://install.direct/go.sh)
Installing V2Ray v4.18.0 on x86_64
Downloading V2Ray: https://github.com/v2ray/v2ray-core/releases/download/v4.18.0/v2ray-linux-64.zip
  % Total    % Received % Xferd  Average Speed   Time    Time     Time  Current
                                 Dload  Upload   Total   Spent    Left  Speed
100   608    0   608    0     0    581      0 --:--:--  0:00:01 --:--:--   581
100 10.5M  100 10.5M    0     0   172k      0  0:01:02  0:01:02 --:--:--  194k
Extracting V2Ray package to /tmp/v2ray.
Archive:  /tmp/v2ray/v2ray.zip
  inflating: /tmp/v2ray/config.json
   creating: /tmp/v2ray/doc/
  inflating: /tmp/v2ray/doc/readme.md
  inflating: /tmp/v2ray/geoip.dat
  inflating: /tmp/v2ray/geosite.dat
   creating: /tmp/v2ray/systemd/
  inflating: /tmp/v2ray/systemd/v2ray.service
   creating: /tmp/v2ray/systemv/
  inflating: /tmp/v2ray/systemv/v2ray
  inflating: /tmp/v2ray/v2ctl
 extracting: /tmp/v2ray/v2ctl.sig
  inflating: /tmp/v2ray/v2ray
 extracting: /tmp/v2ray/v2ray.sig
  inflating: /tmp/v2ray/vpoint_socks_vmess.json
  inflating: /tmp/v2ray/vpoint_vmess_freedom.json
PORT:51332
UUID:7378f6a4-790a-11e9-8f9e-2a86e4085a59
Created symlink /etc/systemd/system/multi-user.target.wants/v2ray.service → /etc/systemd/system/v2ray.service.
V2Ray v4.18.0 is installed.
然后编辑/etc/v2ray/config.json文件,如下设置:
{
  "inbounds": [{
    "port": 10808,  // SOCKS 代理端口,在浏览器中需配置代理并指向这个端口
    "listen": "127.0.0.1",
    "protocol": "socks",
    "settings": {
      "udp": true
    }
  }],
  "outbounds": [{
    "protocol": "vmess",
    "settings": {
      "vnext": [{
        "address": "server", // 服务器地址,请修改为你自己的服务器 ip 或域名
        "port": 10086,  // 服务器端口
        "users": [{ "id": "b831381d-6324-4d53-ad4f-8cda48b30811" }]
      }]
    }
  },{
    "protocol": "freedom",
    "tag": "direct",
    "settings": {}
  }],
  "routing": {
    "domainStrategy": "IPOnDemand",
    "rules": [{
      "type": "field",
      "ip": ["geoip:private"],
      "outboundTag": "direct"
    }]
  }
}
编辑完成后保存,重新启动v2ray
root@vm:~# service v2ray stop
root@vm:~# service v2ray start
root@vm:~# service v2ray status
● v2ray.service - V2Ray Service
   Loaded: loaded (/etc/systemd/system/v2ray.service; enabled; vendor preset: en
   Active: active (running) since Sat 2019-05-18 08:58:43 CST; 5s ago
 Main PID: 8025 (v2ray)
    Tasks: 7 (limit: 2311)
   CGroup: /system.slice/v2ray.service
           └─8025 /usr/bin/v2ray/v2ray -config /etc/v2ray/config.json

5月 18 08:58:43 vm systemd[1]: Started V2Ray Service.
5月 18 08:58:43 vm v2ray[8025]: V2Ray 4.18.0 (Po) 20190228
5月 18 08:58:43 vm v2ray[8025]: A unified platform for anti-censorship.
5月 18 08:58:44 vm v2ray[8025]: 2019/05/18 08:58:44 [Warning] v2ray.com/core: V2
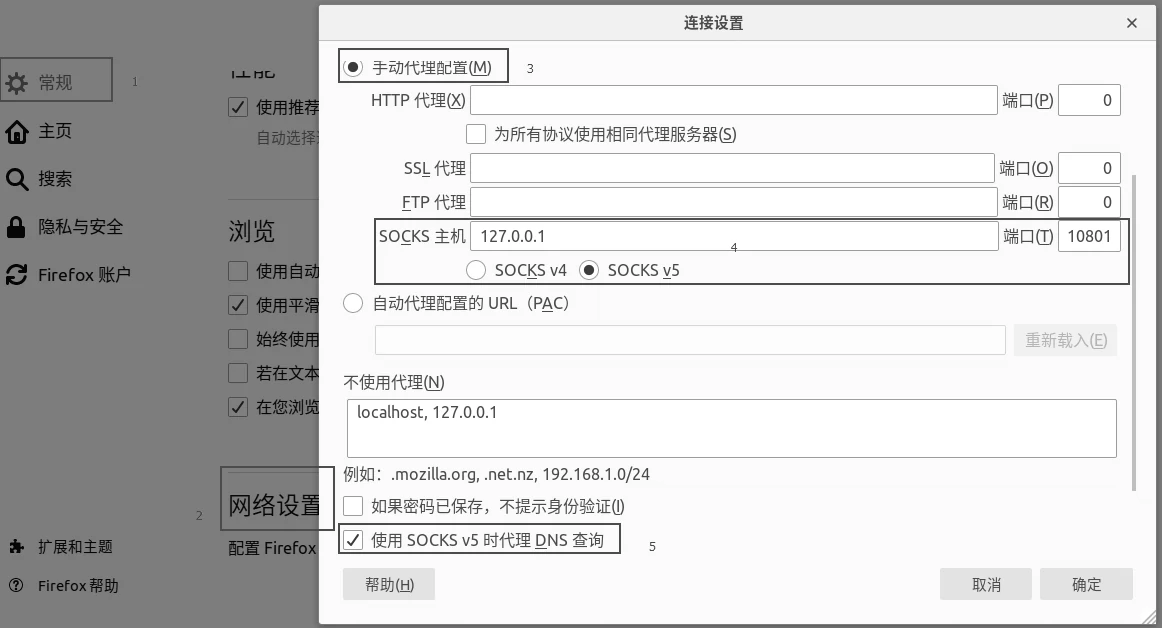
然后Firefox设置代理如下:
设置-常规-网络设置 勾选手动代理配置,在SOCKS主机中填入127.0.0.1本地IP和端口,协议勾选SOCKS_v5 建议勾选使用SOCKSv5时代理DNS
Recent Comments